Asian cucumbers

Each week I look for hidden treasures at my local farmers’ market.  The Collingswood Farmers’ Market to be specific.  Hidden or out in front there is always something new.  It might be an early harvest of a beloved crop or it might be something new being tested against the tried and true.

This week Farmer Julie of Our Yards Farm, the first suburban farm in Camden County NJ  (suburban farms are farms that utilize pieces of yards and gardens in areas that are not traditional farmlands) had a basket full of Asian cucumbers.  Asian cucumbers, I was told,  are usually close to twenty four inches long and sometimes curvy.  At first I chose the last curvy one.  It was interesting looking and I thought it would photograph well for this blog.  A young woman shopping next to me asked for a similar cucumber but was told I had picked up the last one.  Asian cucumbers were new and in short supply.  Not wanting the other shopper to go away without the vegetable she wanted, I handed it to her and took a smooth straight Asian cucumber of another variety.  After exchanging pleasantries and the back and forth of “you take it…no, you have it”, we settled on me taking the smooth one and she taking the curvy one.  IMG_5936

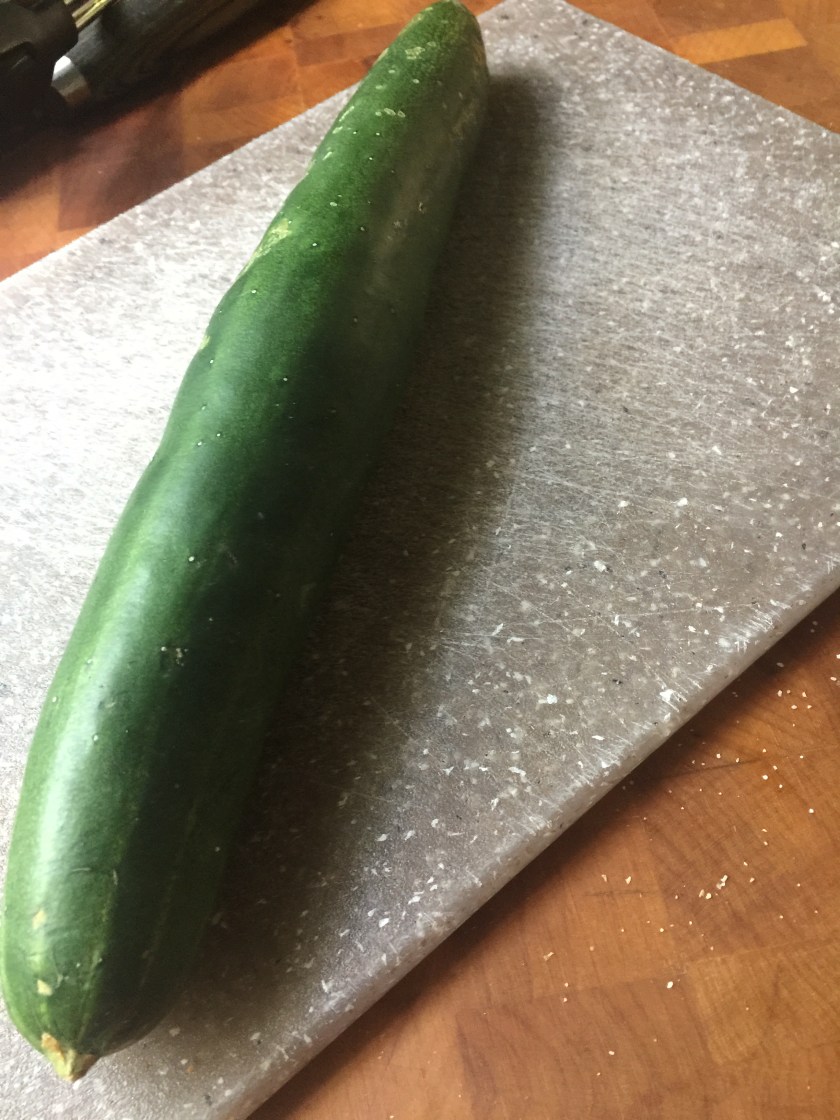
What a pleasant surprise this cucumber was!

I peeled it and sliced it (into three dozen slices!) and drizzled about a tablespoon of my favorite vinaigrette dressing over it.  I let it sit in its bowl on the counter while I prepared the rest of the meal.  I served it just like that.


It was delicious.  And different enough to have it’s own blog post.  Sweet.  Crisp.  Light.  A perfect, simple summer delight of a salad.  (And the leftovers stayed sweet and crisp and light in a jar in the refrigerator until lunchtime the next day!)

(If you want more of an Asian flavor you can mix together (for one Asian cucumber): a generous pinch of Kosher coarse salt, 1 teaspoon white and/or black sesame seeds, 1 tablespoon rice wine vinegar, 1/2 teaspoon toasted sesame oil, a generous pinch of sugar, a pinch of red pepper flakes and drizzle over and let marinate).

I’ve found many food treasures at the market.  Gray zucchini, tomato berries, Asian long beans, white cucumbers, eight ball zucchini, miniature cantaloupe….. Each year I look for what I’ve had before and for things I’ve never had before.  And I’m never disappointed.

quotes-sayings-capt-sparrownot-all-treasure-is-silver-and-gold-mate

short ribs bison style

This weekend was too hot and way too humid to fire up the grill.  I know this sounds crazy….but putting on the oven was an easy and cool solution (especially because I have air conditioning in the kitchen!).

I purchased a rack of short ribs from my favorite Buck Wild Bison guys.  They are at the Collingswood Farmers’ Market every week with their professional display and their ever changing choices.  They make special bundles every week with a variety of cuts of bison at a great grouped price.  And every week there are surprises on the white board.  Recently I bought short ribs.IMG_5906

As always I was reminded that the leanness of the bison requires a shorter cooking time at a lower temperature for success, so I adapted my tried and true oven method by lowering the temperature and shortening the cooking time.  Perfect for a lazy Sunday afternoon.

Ingredients:
rack of bison short ribs
barbecue sauce

Directions:
1.  Completely thaw the short ribs.
2.  Preheat the oven to 300 (three hundred) degrees Fahrenheit.
3.  Open the package and dry the ribs with paper towels.


4.  Cut the ribs apart between the bones.IMG_5911
5.  Place ribs, bone side down, in an oven proof baking dish.
6.  Cover and seal (I used aluminum foil) the baking dish.
7.  Place the baking dish in the oven and set a timer for one hour.IMG_5916
8.  At the end of the first hour, take the ribs out of the oven, remove the cover, paint or pour your favorite barbecue sauce over each rib, re-seal and cover the baking dish and put in the oven for another hour.IMG_5923
9.  At the end of the second hour, take the ribs out of the oven, remove the cover, paint or pour a little more of your favorite barbecue sauce over each rib, return the uncovered pan of ribs to the oven for 30 minutes.IMG_5945
10.  At the end of 30 minutes take the ribs out of the oven and allow to rest for about ten minutes.
11. Remove the meat from the bones and enjoy.  The meat will be fork tender and come easily off the bone.IMG_5965

Husband and I enjoyed a COOL quiet, and easy meal of mouth watering bison short ribs and market vegetables and the house smelled terrific all day!  IMG_5966

Bison tomahawk on a summer afternoon

This year there is a new vendor at the Collingswood Farmers’ Market.  Buck Wild Bison is a family business that sells locally raised, humanely harvested bison meat.  It is a healthier alternative protein.  Lower in fat and cholesterol than choice beef, chicken, pork, and salmon, bison from Buck Wild Bison has become a dinner choice for my family.

Recently we had the opportunity to experience a tomahawk steak.  A tomahawk steak is a cut of the ribeye that has five or more inches of extra rib bone for presentation purposes. It’s called a “tomahawk” cut because the steak with the long bone resembles a single-handed axe.


Husband and I decided to grill our tomahawk.  He recently purchased his dream charcoal grill and was interested in doing something bigger than burgers.  IMG_0006

First be sure the steak is completely thawed.  This could take a while as our tomahawk was 2 1/4 inches thick.  Then dry the meat with a paper towel.

Set up a fire with direct and indirect cooking areas.  Husband used a drip pan of water in the indirect area to keep the meat moist during cooking.

After the coals are burning and nicely “ashed” over he added a couple of pieces of hickory at either end of the bed of charcoal.  Adding the wood is a personal preference.  Bison speaks for itself.  It is not a strong flavor, but there is definite deliciousness in the meat that does not need any help from wood or spices.

The steak was placed on the indirect heat side of the grill and the lid was closed.  At this point it is important to note that the dampers on the grill with about 75% CLOSED.  This keeps the fire from burning too hot.  Bison does not like high temperatures.  LOW AND SLOW are the watchwords here.

Husband was looking for a grill temperature of 225-235.  Since lid thermometers are notoriously unreliable, he also checked the meat temperature every 10 to 15 minutes with a Thermopen Mark IV.  Thermopens are very accurate and very reliable.  He was looking for the meat to reach a temperature of about 125.

He flipped the meat, remember still on the cool side of the grill, every second temperature check.  After about an hour the meat reached the desired temperature.  125 degrees Fahrenheit.  The meat was then moved over to the direct heat side for a sear.  The meat was seared on the direct heat side for about 3 minutes a side.  The internal temperature was now 135 F for a medium done.

Once the meat reached 135 F it was taken off the grill and covered with foil to rest about 8 minutes.

While this seems like quite a long process to make a steak on the grill…this was not any steak…and it was absolutely delicious!

While husband was outside enjoying his grill, I was inside making the rest of the meal.

At husband’s request, I made caramelized onions and mushrooms.

Caramelized onions are a delicious addition to any meal, especially bison.  They take a little time, but are worth the effort.  When I make them I always make extra.  The leftovers are jarred and put in the refrigerator and can be used all week.

Spring onions are everywhere at the market so I made a pan of those.  Choose what onions you like, slice them up, and saute them slowly in a large frying pan with some butter and olive oil.  Slow is the idea.  Stir the onions frequently in the beginning and less frequently as they caramelize.  The whole process can take 30 to 45 minutes.  Again…as with the bison…low and slow.  Amounts vary with the amount of onion, but be a little generous.  When the onions are done to your taste, sprinkle with a little Kosher coarse salt and a couple of tablespoons of a good balsamic vinegar.

The Collingswood Farmers’ Market also gives me access to beautiful mushrooms from Davidson’s Mushrooms.  They carry six different kinds of fresh, flavorful mushrooms. Try these mushrooms and you’ll never buy that box of white buttons again!  Julia Child taught me how to fry mushrooms.  There is a technique.  I’d been frying mushrooms for years, but it wasn’t until I tried Julia Child’s way that I truly experienced the earthy deliciousness of mushrooms.

Heat a skillet.  Heat up some olive oil.  Melt some butter into the olive oil.  Let the butter bubble up and then bubble down.  You’ll see what I mean when you do it.  Amounts will vary based on the amount of mushrooms.  When the butter has bubbled down, toss in your sliced or chopped mushrooms.  Stir them around until all the oil and butter is absorbed into the mushrooms.  Stop stirring and watch as the mushrooms start to glisten and release the oils.  Now stir them infrequently as they brown.  Beautiful!

I also roasted a pan of Sicilian eggplant and zucchini.  Both are plentiful at the market right now.  For this preparation I used two zucchini, one from AT Buzby Farm and one from Springdale Farm.  ( I love treasure hunting at the market!).  AT Buzby Farm has delicious Sicilian eggplant.  Those are the big round ones.  They are absolutely sweet.  No salting required.

I peeled the eggplant and sliced it.  I cut the ends off the zucchini and sliced them.  I sprayed a tray with olive oil (did you know the dull side of aluminum foil is non-stick?) and placed the vegetables on the tray.  I sprayed them with olive oil (I have a very nifty sprayer that was invented by a local person).  I also sprayed them with a new product called Liquid Aminos.  It is advertised as a natural soy sauce alternative.  I got mine at Mom’s Organic Market in Cherry Hill.  I put the trays in the oven at 350F for about 45 minutes.  Again…leftovers can be jarred for later use.

Husband and I are discovering the joys of a screened in porch along with a new grill.  The weather was beautiful.  The afternoon was quiet.  The company was lovely.  And the food was absolutely delicious!

Bison, vegetables, and a summer afternoon.  It doesn’t get much better than that.IMG_5833

Aunt Gig’s refrigerator pickles.

Aunt Gig was actually my Great Aunt Gig.  She was my mother’s aunt.  For most of my life I thought her name was Gig.  Really it was Anne.  And I don’t know why everyone called her Gig.  Everyone did.  Everyone.

Aunt Gig was Czechoslovakian by descent and was a very good cook.  This is her very simple recipe for refrigerator pickles.  Refrigerator pickles are exactly what they say they are.  They are pickles that have a warm brine poured over them and then they are put in the refrigerator for two weeks.  You can eat them anytime after you brine them, but they are most flavorful if you wait two weeks.

This recipe makes 2 quarts of brine and will yield about 2 quarts of pickles.  Remember the glass measuring cup is for liquid ingredients and the plastic cups are for measuring dry ingredients.

Ingredients:
2 quarts of water
1/2 to 3/4 cups of white vinegar
1/2 cup sugar
1/3 cup salt
Six cucumbers (not giant ones…small to normal.  If you use small cucumbers you will need more than six)
fresh dill
garlic clovesIMG_5658
glass jars with lids

Directions:
1. Put vinegar, water, sugar, and salt in a large saucepan.  Bring the liquid mixture to a boil.  Stir until the salt and sugar are dissolved.


2.  Let the liquid cool for about 30 minutes.
3.  While the liquid is cooling, put two cleaned cloves of garlic and a bunch of dill into the bottom of the glass jars.  Put as much garlic and dill into each jar to suit your taste.


4.  Cut the cucumbers into spears and/or chips.  Place the cut cucumbers into the glass jars overtop of the garlic and dill.


5.  Pour the still warm (but cooled) brine liquid into the jars.  Cover the cucumbers with the brine liquid.  Put a lid on each jar.  Do NOT put the lid on too tight.


6.  Store in the refrigerator.  Ready to eat in about two weeks.


Cucumbers are plentiful right now.  In your garden and, especially at the Farmers’ Market.  At the Collingswood Farmers’ Market, where I shop weekly, there is an abundance of beautiful cucumbers in many varieties.  The cucumbers best suited for this recipe are Kirby Pickles or Kirby Cucumbers.  I’ve purchased them from Viereck Farms, Springdale Farms, DanLynn.  Savoie Organic Farm also has cucumbers.  The ones I look for every year are Savoie Farms white ones.  Yes, white cucumbers.  I like them because they are very mild.  So, when I decided it was time for some of Aunt Gig’s refrigerator pickles I chose those mild white cucumbers for a change.  Any pickling cucumber, any small cucumber will work with this simple old-time recipe.  But the white pickles are crispy and delicious and were my choice this year.

A jar of these pickles (white, green, or mixed) is a pleasant summer addition to any meal and would make a lovely hostess gift.


Plan a picnic or barbecue for two weeks from today…and make some pickles!  (And let the kids help!)


Cucumbers – Viereck Farm, Springdale Farm, DanLynn, Flaim Farm, Formisano Farm, Savoie
Garlic – Savoie, Flaim Farm, Formisano Farm, DanLynn
Dill – Flaim Farm, Formisano Farm (Dill plants at Springdale Farms)

…and another zucchini recipe.

It’s the 4th of July and husband and I are having our own celebration.  It’s 92 degrees outside so we’re eating in the kitchen with our new air conditioner.  A baseball game is on the television.  We’ve got bison burgers and hot dogs.  Sliced Jersey tomatoes.  Baked beans.  And…..zucchini fritters!

Ingredients:
1 zucchini
1 egg, beaten
1/4 cup all purpose flour
1/4 cup grated parmesan cheese
salt

Directions:
Wash the zucchini and cut off the flower end.
Grate the zucchini on the large holes of a hand grater.
Put the grated zucchini in a colander and let it dry for about 15 minutes.
Spread the zucchini out onto several layers of paper towel and roll up to dry.  About 10 minutes.IMG_5678
Beat one egg in a medium sized bowl.
Add the flour, parmesan, and salt.  Mix with a fork.
Add the zucchini and mix with a fork.

IMG_5680
Heat up a frying pan.  Add just enough olive oil to almost coat the bottom of the pan.  Give the pan about five minutes to heat up.  Do not let the oil smoke.
Drop spoonfuls of the zucchini mixture into the hot pan.


Fry until you can turn it in one piece.  About 3 minutes.
Brown on both sides.


Take out and drain on paper towels.
Sprinkle with coarse Kosher salt.  Serve.

IMG_5688
These would be lovely with a basil pesto-mayonnaise dip!

Zucchini three ways.

Every year I wait for zucchini season.  It is so easy to cook and delicious. When I walk past the baskets and baskets of the beautiful vegetables I can see how it might be intimidating.  What shall I do with zucchini?  And how do I keep it from being boring?

What follows are three ways to easily make zucchini so everyone in your family will enjoy it.

First at the Collingswood Farmers’ market where I shop there are lots of zucchini in many colors and sizes.  Currently there are yellow and green zucchini.  Do not confuse yellow zucchini with yellow squash.  They are different in texture and taste.  Pictured on the left is a summer squash next to a yellow zucchini.


The first and easiest recipe is a kind of quick ratatouille style dish.  I use zucchini, tomatoes, an onion, corn, and a garlic scape.  IMG_5526

Ingredients:
two medium to small zucchini
two tomatoes
two ears of corn
one onion
one garlic scape
butter
olive oil
your favorite cheese

Directions:
In a large enough frying pan melt about two tablespoons of butter into about two tablespoons of olive oil.  When they are melted, fry a roughly chopped onion (or something from the onion family…a leek, a scallion…).  Saute for about 3 minutes to get the onions started.


Then wash the zucchini and cut off the top and bottom.  Slice into rounds and toss into the pan with the onions,

Next roughly chop your tomatoes and toss them into the pan.

While all of the vegetables are cooking on a medium heat, clean the corn.  (My husband likes corn, but he does not like to eat it off the cob…hates to get butter in his beard and mustache.  So I cut the kernels off the ear.  Really very simple).


Allow the vegetables to cook together for another five minutes.  You should be able to pierce the onion and zucchini easily with a fork).  Then take the pan off the heat top with some cheese  and let sit with the lid on until you are ready to serve (ten minutes).


That’s it.  Easy and delicious.  And you can toss in small amounts of other vegetables as they come into season.

Ingredients for Zucchini Spaghetti
1 pint of cherry tomatoes
1 or 2 zucchini (thin enough to fit in the zucchini cutting gadget)
olive oil
butter
spices
Parmesan cheese.

Directions:
Zucchini Spaghetti is made using a little hand held gadget that cuts a zucchini into thin spaghetti.  Cut the end of the zucchini off and twist the vegetable through the gadget,  Turn the vegetable, not the gadget. It comes out like spaghetti.  IMG_5676

Some people eat nothing but zucchini noodles in this dish.  I like to mix half zucchini spaghetti and half pasta for a filling dish.

Begin by making the zucchini spaghetti. zucchini-noodle-chicken-pesto-bowl-method-2a-1024x683

Next, in a frying pan big enough to include the zucchini spaghetti and pasta, fry a small pint box of cherry tomatoes that have been cut in half in about 1/4 cup of olive oil with a tablespoon of butter. Sprinkle with salt and pepper to taste.  (Some of Our Yards Farm’s basil salt would be lovely in here and her dried Italian herbs as well).

Let everything cook down on medium until the tomatoes collapse.  Stir so nothing sticks to the pan or burns. Then toss the zucchini spaghetti into the pan with the tomatoes.

Meanwhile boil the pasta.

Cook the zucchini “noodles” in the tomatoes until they are a little limp and transparent.  Use tongs to flip the zucchini into the tomato sauce.

When the pasta is done, drop it into the pan with the tomatoes and zucchini and add about 1/4 cup of pasta water.  Mix together and  pour it all into a serving dish, sprinkle with parmesan.  Serve.4c9d9ffff728379f5eb73586160c1e37


Easy and tasty.  Even the kids will like it.

And finally.  When the zucchini is BIG, our favorite Z Bread.  I’ve been making it for over 35 years and it never fails to please.  Here is a link to it on this blog.

https://yellowroomupstairs.wordpress.com/2016/06/15/zee-bread-for-john-willis/


“Last night we had three small zucchini for dinner that were grown within fifty feet of our back door. I estimate they cost somewhere in the neighborhood of $371.49 each.”  -Andy Rooney


Zucchini is plentiful, beautiful, healthy, and available by the truckload at the farmers’ market.


Ingredients:

zucchini – AT Buzby, Savoie, Viereck, Springdale
onions – Savoie, AT Buzby, Formisano, Flaim
tomatoes – Springdale, AT Buzby, Viereck
spices – Our Yards Farm
butter – Hillacres Pride
olive oil – Villa Barone (and pasta!)
corn – AT Buzby, Viereck

Deviled eggs three ways.

Deviled eggs are a picnic staple but not everyone likes them.  Deviled eggs are a love it or hate it food.  I love them.  My husband hates them.  Hates them.  Hates the entire idea of hard boiled eggs.  On special occasions though, as long as they are not on his end of the table, he will tolerate them, for my sake.

funny-chicken-quotes-deviled-eggs1

Before you can make deviled eggs, you have to buy eggs.  Your local farmers’ market, and specifically my farmers’ market (Collingswood Farmers’ Market) have eggs.  Beautiful fresh eggs.  Some are white.  Many are brown.  And there are a few that are pastel blue/green.  Those are my favorite.  Those are sold by DanLynn Organic Farm.  I’ve been at her stand buying produce and eggs and have seen and heard people ask her to take the green eggs out of the dozen.  She does it graciously but you should know the color of the egg does NOT change the taste or texture of the egg.  The color of the egg is determined by the breed of chicken that lays it.

752x500px-ZC-e0596d15_081609047

Directions for hard boiling your eggs.
Place twelve  cold eggs in a large wide pot and cover with cold water by 1 inch.  Bring the water to a boil, then reduce the heat to medium low and simmer for 10 minutes by the clock.  Drain the eggs and run under cold water until cool.  Some people put ice cubes in the water to speed the process.  The cold water helps the shell to separate from the cooked egg.

Directions to prepare your hard boiled eggs for filling.
Peel the eggs.  Cut them in half lengthwise.  Carefully scoop or pop out the yolk into a medium mixing bowl. Place the split and empty whites on a plate.


Directions for “regular” deviled eggs filling.

Mash the twelve eggs yolks in a mixing bowl.  Add 4 tablespoons of mayonnaise, 1/2 teaspoon of mustard, salt to taste.  Mash all of the ingredients together until it is a smooth paste.  Spoon the mixture into the hole in the egg white halves.  Put on a plate and sprinkle lightly with paprika. Serve.

deviled-eggs


Directions for deviled eggs with a “secret” ingredient. (These are delicious!)

Mash the twelve egg yolks in your mixing bowl.  Add 1/3 a cup of mayonnaise, (shh…secret ingredient coming up) 2 tablespoons unsalted butter at room temperature, 1 teaspoon dijon mustard.  Mash all of the ingredients together until it is a smooth paste.  Spoon the mixture into the hole in the egg white halves.  Put on a serving plate and sprinkle lightly with paprika.

These eggs are delicious!  People will notice a difference and love them, but will never be able to guess what the secret ingredient is!

classic-deviled-eggs


Directions for Fancy Deviled Eggs.

Fry three slices of chopped prosciutto in a little butter.  When the prosciutto
is crispy (but not burned), take it out of the frying pan and drain on paper towels.
Mash the twelve egg yolks with 4 tablespoons of mayonnaise, a teaspoon of mustard, and most of the fried prosciutto.  Leave some for garnish.  Mix all ingredients until well blended.  Spoon into the egg white half, top with a piece of crispy prosciutto and a micro green. (Micro greens are the shoots of salad vegetables picked just after the first leaves have developed.  You can find them at most supermarkets.  At our farmers’ market we have used other alternatives like fresh parsley leaves or small trimmed greens from spicy lettuce mixes sold by a few farmers.  Experiment!).

img52l

These are as simple as regular deviled eggs, but much more elegant. My daughter Kate introduced these to us.  She is a deviled egg lover and always brings them to our gatherings.  Regular or fancy, her father still doesn’t like them.


Ingredients from the Collingswood Farmers’ Market
Eggs – DanLynn Organic
Spicy Greens – Our Yards

bison brisket tacos

98c5b652e87421e98e83eed51f90bfb9

I have two daughters who learned to cook in my kitchen.  They started out baking cookies and mixing up fresh thousand island dressing for salads.  Gradually they started making full meals with many and various courses.  They are now grown women with their own families and kitchens.  And they are good cooks!  What follows is my younger daughter Kate’s recipe for bison brisket tacos.

This recipe is one that uses, among other things, a slow cooker.  As my daughter works all day in the city she likes this recipe because she can drop it in the slow cooker and everything is done when she wants it to be.

Ingredients for the brisket:
1 bison brisket (two to three pounds)
2 large onions sliced into half moons
Coarse Kosher salt and freshly ground black pepper.
1 to two cloves of garlic, minced (your preference)
2 cups of beef broth
2 tablespoons Worcestershire sauce
1 tablespoon soy sauce (or tamari, if gluten free)


At this point you are cooking a brisket and it can be eaten as simply a brisket with potatoes and vegetables on the side…..but the brisket can also be so much more…like TACOS!

Directions for the brisket:
1.  Spray the inside of the slow cooker insert with oil, then spread the onions out over the bottom of the slow cooker insert.  Rinse and dry the brisket.  Season each side of the meat with salt and pepper to taste.
2.  Place the brisket in the slow cooker.
3.  Add the minced garlic.
4.  Pour the liquid over everything.  Then stir things around so the onions are around and on top of the meat.
5.  Cook on low for 6 to 8 hours.IMG_1495
6.  When the meat is done, take it out of the slow cooker and shred it with two forks until it is consistent with how you like meat for your tacos.

IMG_4024


Ingredients for the tacos:
4 to 8 flour tortillas (one per taco — the brisket makes enough for 4 to 8 tacos depending on how much meat you want on each one.
1 avocado
Juice of 1 lime
Granulated roasted garlic to taste, about 1 teaspoon
Delicate greens, washed, shredded, chopped and/or spicy greens

Directions for the tacos:
1.  Take the tortillas, wrap them in a slightly damp paper towel, and microwave for 10 to 20 seconds to warm and soften.  Put each tortilla on a plate.IMG_4028
2.  Into a sandwich-sized zippered plastic bag, put the avocado flesh, granulated garlic to taste, and lime juice.  Zip the bag shut and squeeze with your hands until desired consistency.  Snip off one of the bottom corners and squirt a generous helping onto each tortilla. (Kate calls this “lazy guacamole”…which she uses on week nights when she’s busy and tired but still wants something delicious and guacish!)


3.  On a rimmed sheet pan, spread the bison brisket meat and onions in a single layer.  Some liquid from the slow cooker is nice with the meat and onions, but not essential.
4.  Heat up your broiler. Place the tray with the meat and onions under the broiler for 5 to 7 minutes depending on how crispy you like it.  After the meat and onions have crisped, remove the tray from under the broiler and stir around.

IMG_4031
5.  Add a heap of greens onto each tortilla, on top of the “lazy guacamole”.

IMG_4029
6.  Top with a heap of delicious bison meat and onions.  Enjoy!


If you have any of the meat and onions mixture leftover ….pile it on a roll for a delicious sandwich or mix in with mac and cheese, or just serve with your favorite vegetables.  Kate’s husband gives this meal a thumbs up and hopes for leftovers to take to work for his lunch.
IMG_4039
Kate shops with me every week at the Collingswood Farmers’ Market.  She has for years.  Now that she and her sister run their own kitchens, they both shop for their weekly meals on Saturday morning.

Where to shop at the market for this meal:
Bison brisket – Buck Wild Bison
Greens _ Our Yards Farm
Avocado and Lime – Sara’s Produce


bison chipped steak poutine

The Buck Wild Bison guys are doing a great business every week at the Collingswood Farmers’ Market, with good reason.  The meat is lean and delicious.  And they are very helpful and friendly.

This week I bought some chipped steak.  This is the cut of meat used for steak sandwiches.  fullsizeoutput_4a08

Poutine is an increasingly popular French Canadian fast food.  It consists of thick French fried potatoes topped with cheese curds and meat gravy. Poutine is easy and a crowd pleaser.  Adding bison to it raises the bar.  (Husband was skeptical when he heard the name but, when he heard the ingredients, he was willing to give it a try.)

Cheese curds are sometimes (read rarely) available from Hillacres Pride at the market.  When they are available, grab them.  They are delicious.  Luckily cheese curds are also readily available in many local supermarkets.IMG_5298

You can make your own fries.  Cut the potatoes, dry them, fry them or you can use your favorite frozen fries.  Just make sure they are the thick cut variety. fullsizeoutput_4a05


Ingredients:

frozen French fries
bison chip steak
butter
cheese curds
mushrooms
extra brown gravy (optional)

Directions:

  1. Prepare French fries.
  2. While you are preparing the fries (and this is another reason to use frozen), fry some mushrooms (from Davidson’s Exotic Mushrooms at the market every week!) in butter.IMG_5308
  3. Put two tablespoons of butter in a large frying pan.  Melt it.  Then dump the package of chipped bison steak into the pan.  Stir it around until the meat is no longer red.
  4. Prepare each plate or make a large platter for everyone to share.  First layer the fries.  Next distribute the cheese curds on the hot fries.  Now top with the cooked bison chipped steak and all of it’s gravy.  (If your feel you’d like more gravy you can use gravy you’ve saved from a roast bison or you can use your favorite jarred brown gravy).

    The dish should be hot enough to melt the cheese curds.  If you need to warm your poutine, put it in a 350 degree oven for a few minutes.  Do not microwave.

And that is it.  Easy enough to feed the kids on a weeknight.  And fun enough to serve casually to guests.

The bison chip steak makes this meal.  It is easy to cook, juicy, and delicious!

IMG_5322


sugar snap peas in a snap

Sitting pretty on the edge of Les Viereck’s table at the Collingswood Farmers’ Market this week was the first of the snow peas and the sugar snap peas.  I purchased a one pint box of snap peas for a quick and easy spring vegetable treat.

Sugar snaps are very easy to cook.  And different.  After a long winter of the same old things, I was excited for the treat.

IMG_5275

Ingredients

1 pint box of sugar snap peas
3 small scallions (green onions)
two large crimini mushroom caps
two tablespoons of butter
salt to finish

Directions

  1. Place a frying pan on medium high heat and drop in the butter.IMG_5276
  2. Slice up three small scallions (green onions… another fresh spring treat from Our Yards Farm) and place in the frying pan and melting butter
  3. Top and tail the snap peas (cut off a little of each end) and place in the frying pan with the melting butter and scallions.IMG_5288
  4. Cube up, into tiny cubes, two large mushroom caps.  Place the mushrooms in the pan together with the butter, scallions, and snap peas.IMG_5289
  5. Saute for a minute or two.  Stir so all ingredients are coated with butter and none are burning.
  6. The snap peas will change from a bright green to a duller green.  When they do, take off the heat and put a lid on the pan for 2 to 3 minutes.
  7. Pour into a bowl, sprinkle with some coarse Kosher salt, and serve.

Very simple.  Quite delicious.  A light spring pea flavor. feb4bd303b66685a763053a920d763c4