Johnny Marzetti…a born guest.

Johnny Marzetti is a real crowd pleaser.  His appearance will make your next pot luck or picnic the hit of the summer season!

Don’t know Johnny Marzetti?  To know him is to love him.  Johnny Marzetti is an Italian dish created in Marzetti’s restaurant in 1896 in Columbus, Ohio.  It is a simple and delicious casserole that will replace that same old baked ziti as your “go to” contribution to any get-together.  It’s that easy and that delicious.

IMG_5250

The ingredients are easy to get at the Collingswood Farmers’ Market.  Butter, ground beef, and shredded cheddar cheese from Hillacres Pride.Crimini Mushrooms from Davidson’s Exotic Mushrooms, onions from Formisano Farms, canned Jersey tomatoes from Flaim Farms (I think in season, fresh crush Jersey tomatoes would be fantastic!), pasta from Villa Barone.

Ingredients:

3 tablespoons of olive oil (or butter if using grass fed beef as we are here).
1 large onion, chopped
3/4 pound of crimini mushrooms, sliced
2 lbs. ground beef (you could use bison or even ground turkey)
1 twenty-eight ounce can of crushed tomatoes with juice
1 1/2 pounds of cheddar cheese, shredded
1 pound of pasta, cooked and drained

Directions

  1. Preheat oven to 350 degrees Fahrenheit.
  2. Cook pasta.IMG_5233
  3. Set a large saute pan over medium high heat.  Add oil and onions and saute until onions are translucent (about 3 to 5 minutes).  Add mushrooms and saute until softened (about 5 minutes).  Add beef (bison or turkey) and saute until it begins to brown, breaking any lumps (about 7 to 10 minutes).
  4. Remove pan from heat and stir in crushed tomatoes and their juice.
  5. Add all but 1 cup cheese.
  6. Transfer to a 10 x 15 inch baking dish.
  7. Add cooked pasta.  Mix gently.IMG_5241
  8. Scatter remaining cheese on top.IMG_5246
  9. Bake until cheese topping is browned and bubbling (about 35 – 40 minutes).  Serve.

IMG_5247


fullsizeoutput_49f7

Johnny Marzetti is a born guest! And one of my favorites.

All life is an experiment. Ralph Waldo Emerson

The 18th season of the Collingswood Farmers’ Market opened with sunshine and promise.  The promise of new vendors and new foods.  While I always have in mind what is in season and what will likely be offered for sale, I always am ready to try something new.  To experiment.  To experience.

The first new vendor I spotted was Buck Wild Bison.  I approached the stand and three very friendly and knowledgeable men engaged with me in conversation about exactly what bison tastes like.  I am a longtime buyer of grass fed and pasture raised beef, pork, lamb, and poultry from Hillacres Pride so why should I try bison.  Well, because all life is an experiment.  Bison is lower in fat than chicken, I was told.  And the taste is not as strong as grass fed beef.  Remembering that it took some time for my husband to like the taste of grass fed beef, I thought I would give it a try.

Next we discussed how to cook it.  I offered that my husband had just bought a new charcoal grill and would likely want to experiment with that method of cooking bison.  I was given several suggestions and it was decided I would buy rib eye steak and my husband would grill it.   I was told to grill it for a shorter amount of time and a lower temperature than beef (160 degrees internal temperature) but that would be the only difference.  Easy.

Excited with my first purchase of the first market I continued down the aisle.  Of course I bought strawberries from A. T. Buzby and Springdale Farms.  Of course I bought asparagus from the same two farmers.  Of course I bought sour dough bread and oatmeal raisin cookies from Wild Flour Bakery.  I turned to face Flaim farms and spotted the whitest, smoothest spring potatoes I had ever seen.  No discussion.  Had to have them.  Spinach from Our Yards.

I filled my wagon twice.  Offloading in the middle of the market.  I bought those “little girl” eggs (double yolks on two of them this week!), some mushrooms, and some sauce and antipasto ingredients.  I was one happy woman!  The market is open and all is right with my food world!

Dinner on market day is always dictated by the market.  Our market day dinner was grilled bison rib eye steak (from Buck Wild Bison), sautéed mushrooms (from Davidson’s exotic mushrooms), creamed spinach (from Our Yards), parsleyed Spring potatoes (from Flaim Farms), sliced hot house tomatoes (from A. T. Buzby).

Directions for a most delicious farmers’ market inspired  meal……….

Thaw, dry, and I lightly salt the bison steak.  My husband grilled at a lower temperature for a shorter amount of time.  He used his thermometer to determine the internal temperature.  The steak was removed from the grill and left to rest for 6 minutes.

Cut up the potatoes, skin on, and boil them until a knife blade can be inserted easily.  Then drain the potatoes, drop a large knob of butter, sprinkle with dried parsley (fresh can also be used), sprinkle with some Kosher coarse salt, and slightly smash.

Melt equal amounts of butter and olive oil in a frying pan.  Clean and cut up the mushrooms.  Watch for the butter to melt and bubble up and then down. When the bubbles go down slightly, toss in the cut mushrooms.  Stir until the butter and oil is absorbed by the mushrooms.  Lower the heat slightly and stir intermittantly until you see the mushrooms shine as they are releasing the oils.  When the mushrooms are browned to your liking turn off the heat and set aside to serve with the bison steak.

Rinse the spinach thoroughly.  Spinach can be sandy.  With some water still on the leaves, drop into a skillet with a knob of butter and a tablespoon or two of olive oil.  Saute over medium heat.  Turn with tongs.  Turn off the heat when the spinach starts to wilt.  Sprinkle with a teaspoon of cornstarch or finishing flour.  Turn again with tongs.  Put a lid of the pot.  When you are ready to serve, turn the heat back on under the pan, pour in about a 1/4 cup of cream, let it bubble a little to thicken. Serve.

Tomatoes.  Just slice them and sprinkle with some coarse salt.

Meanwhile, wash and slice some strawberries.  NJ Fresh!  Dessert…with or without ice cream…but always with whipped cream!

Dinner was an experiment.  A successful experiment.  Bison is delicious.  Light.  It tastes like beef.  A mellow, quiet sort of beef.  Delicious and well worth your time and effort.

Bison.  An experiment that works!  Can’t wait to try the kielbasa!


breakfast for dinner

Decades ago when my daughters were little girls and when my husband travelled for work a lot….the best meal of the week was when we had breakfast for dinner.  Breakfast for dinner was even better than pizza or fast food with a tiny prize.

My nest is empty now and I have begun serving my husband breakfast for dinner.  At first he was skeptical but then I explained that I had frozen bags of those delicious NJ blueberries purchased at the Collingswood Farmers’ Market during the summer.  He was intrigued.

My husband loves blueberries but he has a discerning palate, so when blueberries are in season (mid-summer) I buy pints of them from all the different farmers who sell them at the market and that is nearly all of them (AT Buzby, Flaim Farm, Formisano Farms, Fruitwood Farms, Hymer Farms, Wm. Schober & Sons, Springdale Farms, Viereck Farms…and then there is Green-Ford Bluebery Farm.  Husband tastes them all and rates them.  It is interesting to note that when the berries are fresh and sweet he will simply rinse them and eat them by the bowl.  A pint fits in his favorite bowl.  But, when he’s enjoying his blueberries in a pancake…frozen is what he wants.

Blueberries are easy to freeze.  Rinse them.  Spread them out on a towel or paper towel.  Let them dry completely.  Put in a bag.  Put the bag full of blueberries into the freezer.  They will keep all winter and spring.

So here’s how breakfast for dinner goes in our house.

Fry some bacon (or microwave it or bake it…I still like it fried).  I only use Hillacres Pride no-nitrate bacon.  I heard someone ask once if the non-cured tasted the same as the cured bacon.  Yes…indeed it does.  But you don’t get the added stuff….just pork bacon in it’s pure form.  Delicious!

Break some eggs in a bowl for your scrambled eggs.  I love the “little girl” eggs from DanLynn Farms.  Brown and green shells and oh, so fresh!  Beat them with a fork.  Set aside.  Scrambled eggs cook up quick so that is the last dish prepared….after the pancakes.

IMG_5116

Now make your pancake batter.  This recipe makes 9 six inch pancakes.  You can also use your favorite pancake batter mix.  Breakfast for dinner is supposed to stress free!

Ingredients

2 cups all-purpose flour
2 tsp baking powder
1 tsp baking soda
½ tsp salt
2 Tbs sugar
4 Tbs unsalted butter, plus some for griddle
3 cups buttermilk
2 large eggs, lightly beaten
1 cup fresh or frozen blueberries

Directions

  1. Whisk flour, powder, soda, salt, sugar. Set aside.
  2. Melt butter. Pour into small mixing bowl. Add buttermilk, stir. Add eggs (beat them in the measuring cup you used for the butter), stir a lot.
  3. Pour the milk mixture into the dry ingredients. Stir just until combined. Batter should have small to medium lumps.
  4. Heat griddle for at least 2 minutes over medium flame. Pan pre-heat is critical. Also, the few minutes that it takes to heat the pan winds up being the same amount of time the batter needs to “settle.”
  5. Test griddle by sprinkling a few drops of water on it. If water bounces and spatters, it is hot enough. Plop ¼-tsp fat into the pan and push it around with your pancake flipper. (From time to time, you may need to add a bit more in between pancakes. Fat is unnecessary with a non-stick surface.) Using a 4-oz ladle, about ½-cup, pour pancake batter, in pools 2 inches away from one other. Scatter with blueberries. (If frozen, no need to thaw beforehand.) When pancakes have bubbles on top and are slightly dry around edges, about 2 minutes, flip. (Stick with 2 minutes. If pancakes are cooking quicker or slower, adjust flame.) Cook until golden on bottom, about 2 minutes. Repeat with remaining batter, keeping finished pancakes on a heatproof plate in oven set to 175 degrees F.

IMG_5118


It’s nice to put the finished pancakes in the oven to keep warm while you scramble the eggs to go with the bacon and pancakes.  That way everyone can sit down and eat together.  Family dinner has always been important to us.  Just us two makes for nice conversation.

Husband was skeptical about breakfast for dinner (that and he is not a big egg fan) but blueberry pancakes made from frozen NJ blueberries has won him over.  And a little pure maple syrup warmed in the microwave makes the meal even better.  I am not a syrup person.  That’s because, as my husband says, I’m sweet enough.  But I do like butter.  Butter.  And a little more butter.

IMG_5141

Breakfast for dinner is best eaten in your PJs and robe followed by a very, very, very good movie.

pi day pizza pie

36 years ago I convinced my husband that anyone could make a delicious pizza at home…from scratch.  We were newly married and lived in a setting so rural that there were no pizza places near enough to order for pick up or delivery.  I’m going to share with you…but do make it seem like a bit of hard work or you will never simply order a pizza or even go get one.  Yes, it’s that good.

Today it snowed and husband was home AND it was March 14.  Pizza pie for Pi day!

First…the dough.  You can make it or you can buy it.  The easiest way to buy it is to buy frozen bread or pizza dough in your local supermarket’s frozen case.  It’s there.  You have to look for it. Try near the ravioli.

I make my own these days but I bought frozen dough for years.  I make my own pizza dough in a bread machine.  It takes 1 hour, start to finish.  The ingredients are the same if you mix the dough by hand or with a mixer fitted with a dough hook.

Pizza dough for 1 medium dough:
Ingredients:  1/2 teaspoon of dry yeast, 8 1/2 ounces bread flour (or regular if that’s all you have), 1/3 teaspoon of dry milk powder, 1 Tablespoon sugar, 1/2 teaspoon salt, 1/2 Tablespoon olive oil, 5 ounces of water.  Mix it all together until smooth and let rise in a warm place for 30 minutes to 1 hour.  The dough will be soft enough to push out onto a pizza pan.  Do not attempt to toss over your head to spin it out. 😉

To make the pizza:

Preheat your oven to 425 degrees Fahrenheit.

Generously oil your pan with olive oil.

Place the dough on the pan.  Put a little olive oil on your hands and gently rub to coat the dough.  Now flatten the dough with your hands and push out to the edges of the pan.  Do not use your finger tips as you do not want holes in the dough.  Work the dough firmly and slowly. The dough will fight back and shrink back into a ball if you work it too much.

When the dough it spread flat in an even thickness it is ready for the toppings.

IMG_4844

Spread the grated cheese over the raw dough.  Yes, first.  Yes, before the sauce.  I use a mixture of mozzarella, muenster, and provolone.  Mozzarella alone is gooey but not very flavorful.

Next sprinkle whatever spices you like.  Oregano.  Basil.  Garlic.  And….your taste here.

IMG_4847

With a spoon, drizzle plain tomato sauce on the pizza.  If you decide to use pizza sauce, then extra spices are unnecessary.

IMG_4850

Add toppings now.  I usually use fried mushrooms….sometimes fried peppers…chopped olives.  Again.  Up to you.

IMG_4851

Put the pizza, on the pan, into the middle of the oven.  This pizza is thin and cooks in 20 to 30 minutes.  Keep your eye on it because it can go from underdone to overdone in minutes.

IMG_4854


When we were young…homemade pizza was our Friday night.  We would watch basketball on TV.  Especially great if the Sixers were playing the Celtics.  Then pizza became our Friday night date after the children were asleep.  Then we had Friday night pizza with the children.  It’s just us again now.  Our homemade pizza is a single now.  And sometimes it’s on a night other than Friday.  But it’s always a special meal and way of finding a quiet spot in our still hectic weeks.

If you have any leftover.  The best way to reheat pizza slices is in a non-stick frying pan set to medium.  With a lid.  Crisp bottom.  Melty top.  Delicious!

IMG_4855

stuffed cabbage (because of Stella!)

Winter storm Stella is poised to drop a huge amount of snow on our region.  Or not.  Depends on the wind and the flow and who knows what else.  The weather people are predicting big snow totals for our area (or not)…but I believe them.  I think tomorrow will be a big snow day.

Today I’m making stuffed cabbage.  Delicious.  Warm.  Homey.  And always better then second day.

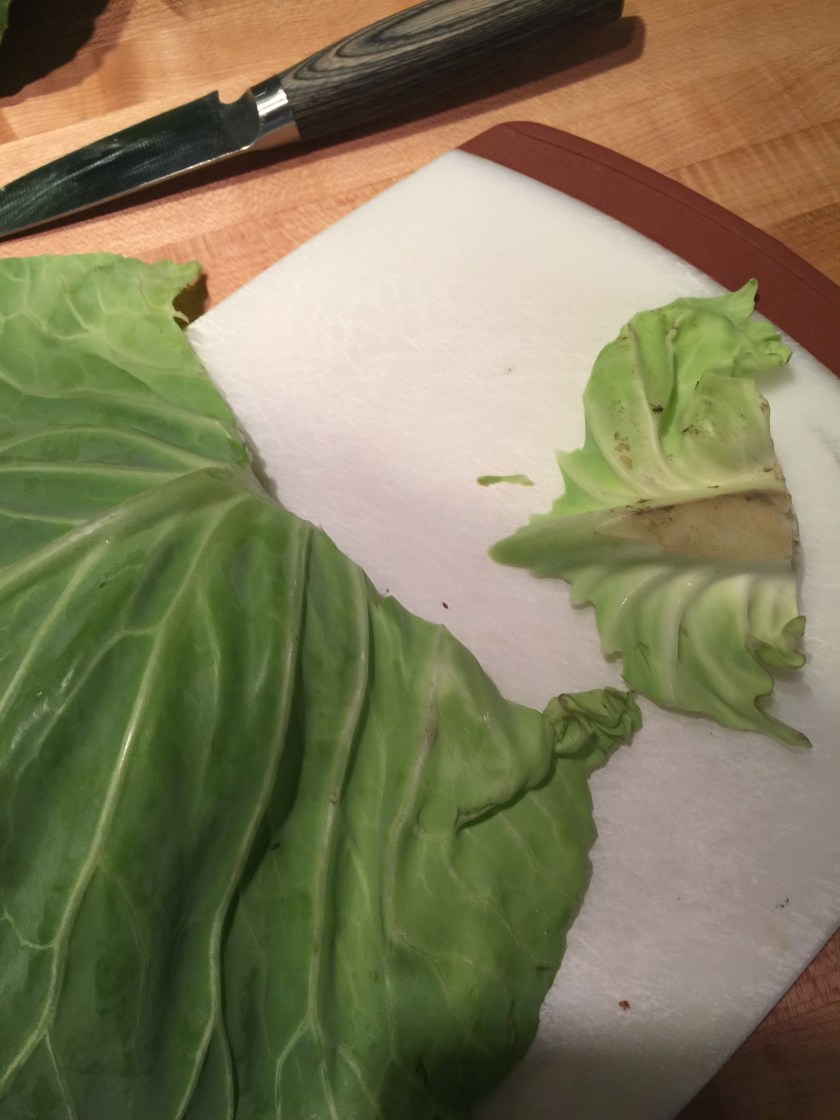
The first thing to do is choose a leafy head of cabbage.  This recipe calls for loose green leaves of cabbage.  This week is Saint Patrick’s Day so stores will have inexpensive, green cabbage for sale.  Many grocery stores (and even farm stands) “clean up” their heads of cabbage by cutting off the outer greener leaves.  I have been lucky to find loose leaves other shoppers have cast aside.  I even have asked the produce manager if he has any.  He will often provide a bag of them.  You may have to buy several heads of cabbage if you can’t find one with enough loose leaves.  You can stockpile your outer cabbage leaves by pulling any off that come with a head of cabbage you’ve purchased and put them in a plastic freezer bag and freeze them until you have enough.  Then thaw and use.

Most people stuff cabbage leaves with ground beef or the standard  meatloaf mix of ground beef, pork, and veal, and white rice.  I stuff my cabbage with ground pork (pasture raised) and pre-soaked pearl barley.

Peel the cabbage leaves and break or cut them off the head.  Do not tear the leaves.  You want whole leaves.  Continue until you can no longer peel the leaves without ripping them.  Then take a knife and core the cabbage head and peel as many more as you can.  Save the leaves you cannot peel off the head.

Put the loose cabbage leaves that are to be stuffed in a steamer basket or a large pot with about an inch of water at the bottom.  Place the loose leaves in the pot and steam them, with the lid on, for about ten minutes.  The leaves should be pliable but not floppy.

While the cabbage is steaming in a lidded pot, make the tomato sauce in which the rolls will be cooked.  This sauce is also good for cooking stuffed peppers.

For the sauce:
Ingredients:
2 Tablespoons butter
1/2 cup of chopped onions
1/2 cup chopped celery
1 can of tomato soup
1 1/4 cups water
2 Tablespoons dried parsley
the juice of a whole lemon
1 teaspoon sugar
salt and pepper to taste

Directions for the sauce:
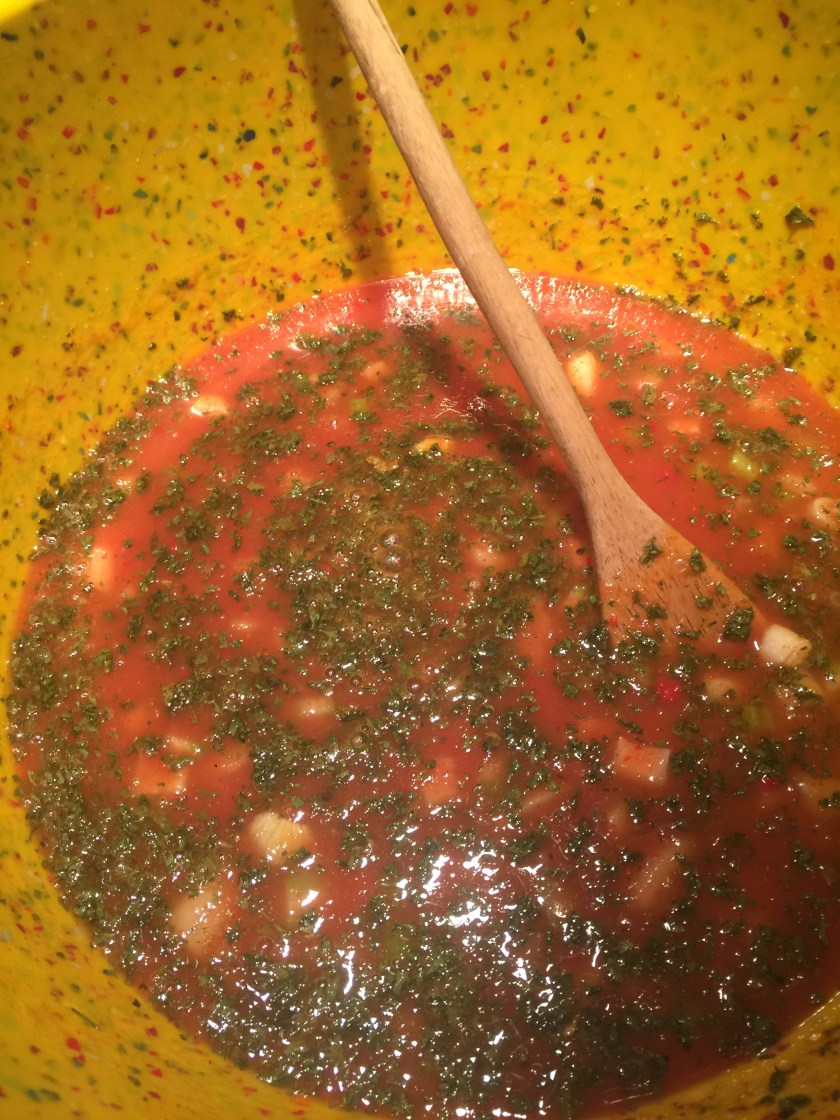
1. Melt 2 Tablespoons of butter in a Dutch oven (I used cast iron)
2.  Add 1/2 cup of chopped onions and a 1/2 cup of chopped celery.  Cook until tender
3.  Add 1 can of tomato soup (I use Amy’s organic Tomato Bisque), 1 1/4 cups water, 2 Tablespoons of chopped parsley, the juice of a whole lemon, 1 teaspoon sugar, and salt and pepper to taste.
4. Turn off the heat and set aside.  You will put the stuffed cabbage rolls into this pot and sauce.

IMG_4535

After making the sauce, prepare the cabbage leaves.  Take each leaf and trim the thick stem if needed.

IMG_4529

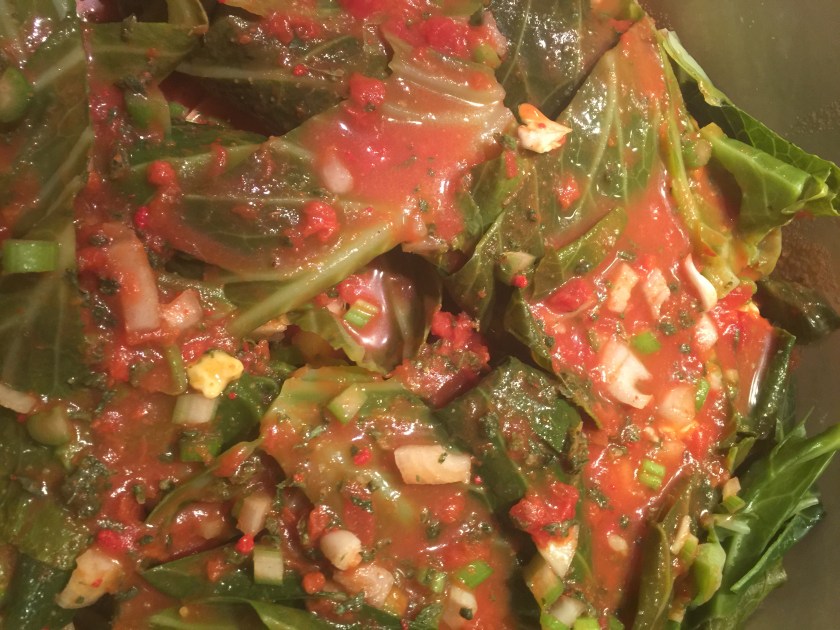
Mix the ground pork and barley.  I generally use one pound of ground pork to 1/4 cup of pearl barley.  You can certainly use more meat or more barley (or uncooked rice) to suit your taste.  Remember both the barley and the uncooked rice will expand in cooking.

Add salt to taste and mix the meat and barley until blended.  Take a steamed, trimmed cabbage leaf and a flattened meatball size ball of the meat mixture and place on the leaf closest to the stem end.  Gently roll the cabbage leaf with the meat mixture inside.  With your pointer finger, gently tuck in the ends.  Be gentle so as not to rip the cabbage leaf.  Place the cabbage roll, seam side down, into the pot of cooking sauce.  Repeat the stuffing and rolling until you’ve used all the leaves and meat.  If you run out of meat mixture, toss the extra leaves into the pot on top of the rolls.  If you run out of cabbage leaves, make balls of the meat mixture and put them on top.

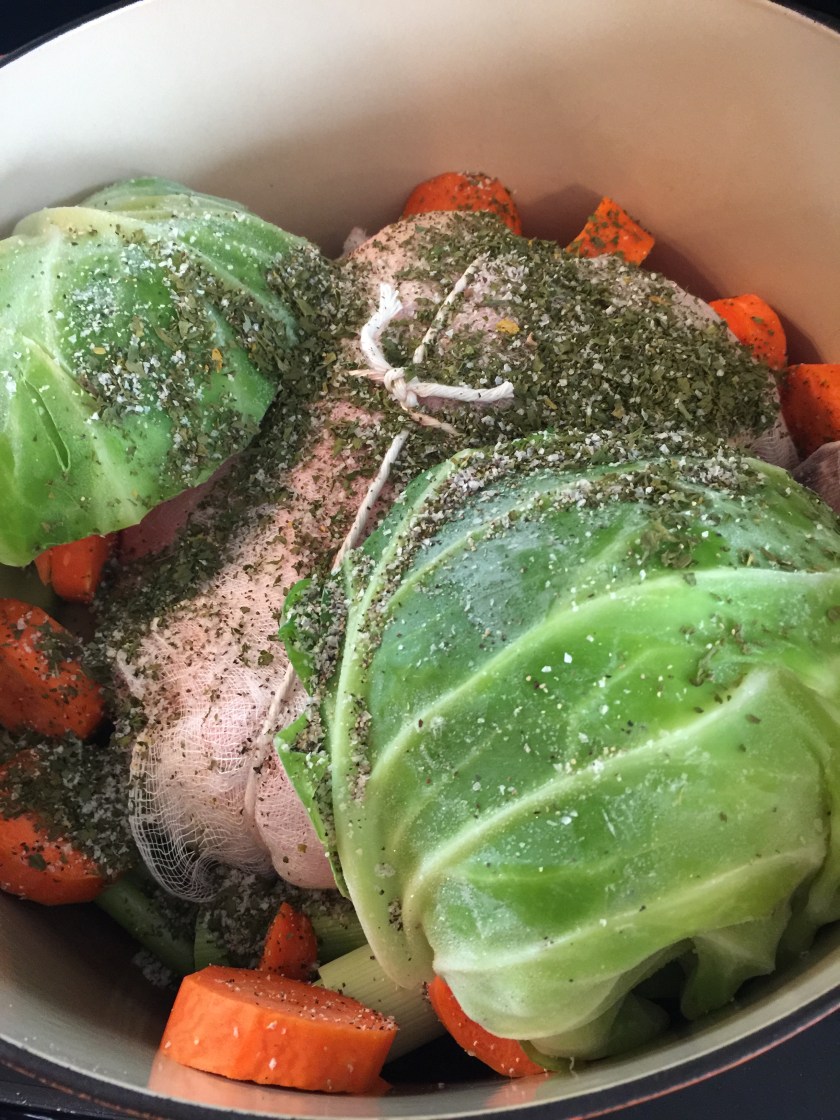
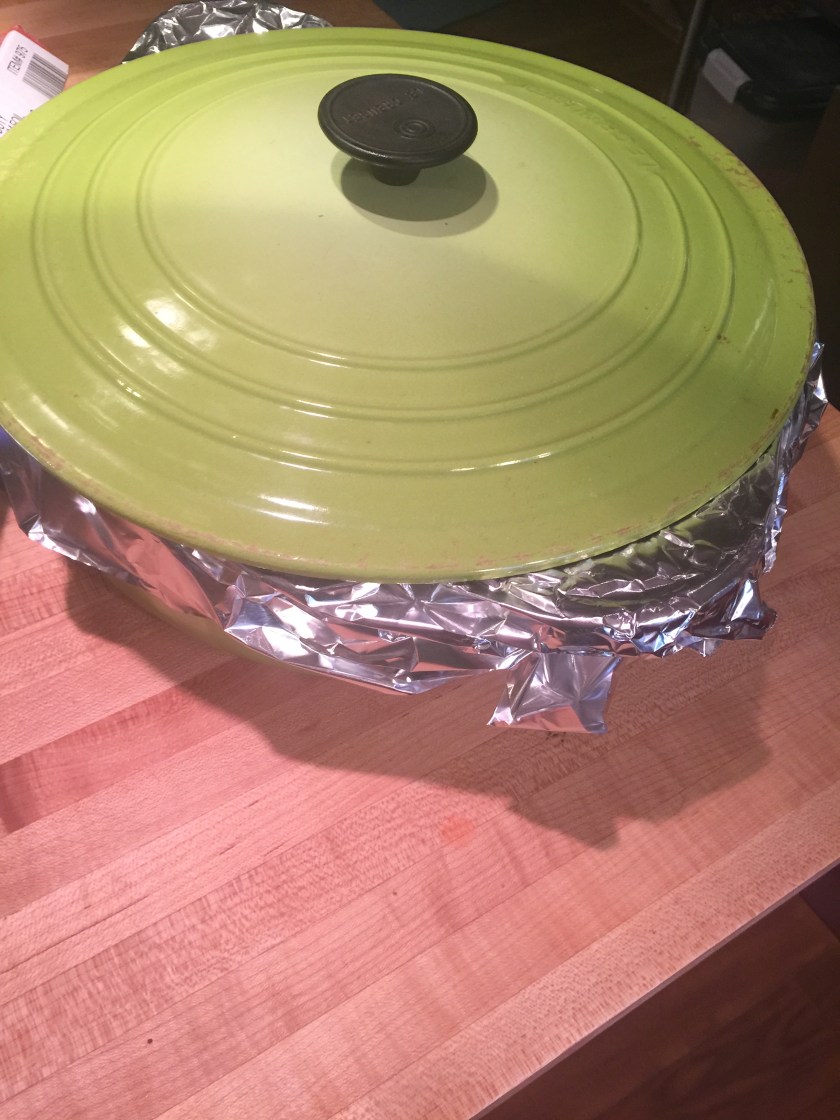
When you have finished making the rolls and placing them in the Dutch oven, take the rest of the cabbage head you didn’t steam, cut into wedges, place the wedges on top of the cabbage rolls.

IMG_4545

Put a tight lid on the Dutch oven filled with cabbage rolls and bake at 325 degrees Fahrenheit for 2 to 2 1/2 hours.

IMG_4547

Many people cook their stuffed cabbage on top of the stove.  I have found that low and slow baking makes the flavors marry and makes the cook happy because she doesn’t have to check everything a hundred times.  In the oven, this is a fix and nearly forget recipe.  About an hour into the cooking time, check the liquid level.  Add water as necessary.

IMG_4551

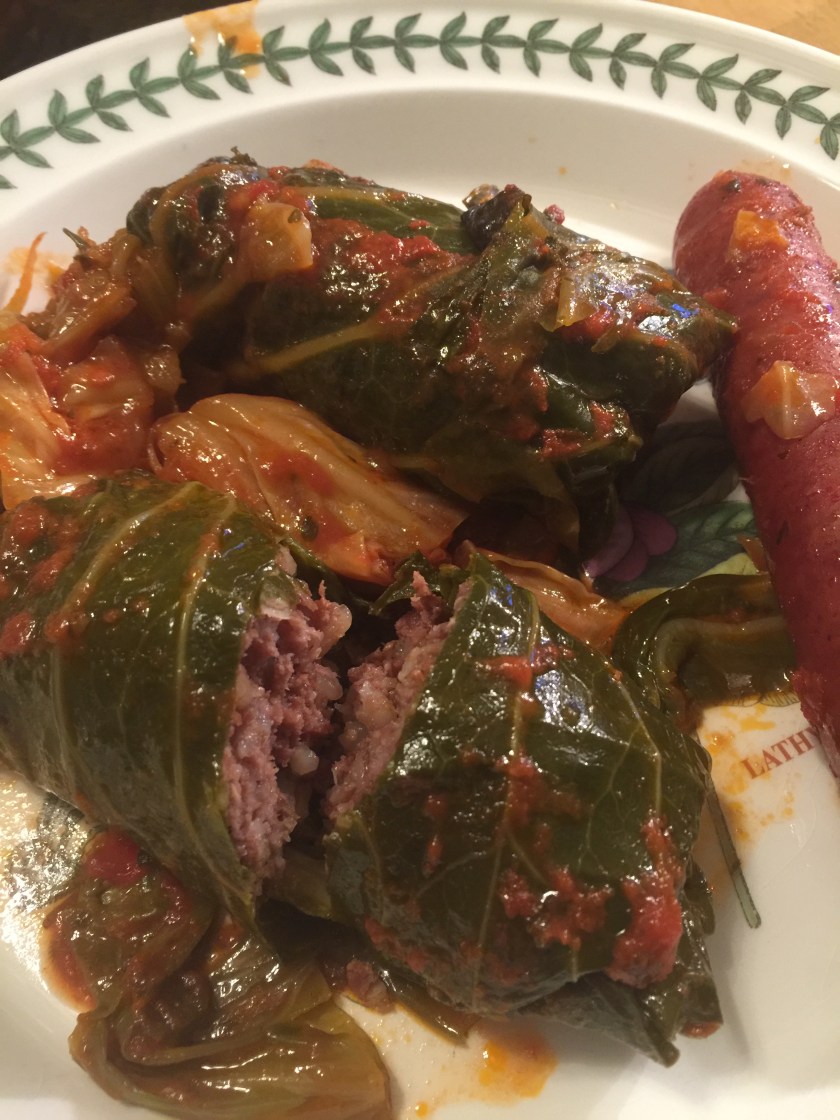
My father was not fond of stuffed cabbage so my mother would put kielbasa (Polish sausage) or hot dogs on top of the cabbage leaves.  They will steam and impart some of their flavor to the pot.  I still do that.

My mother served stuffed cabbage with kielbasa on top, mashed potatoes on the side, and rye bread.  True comfort food.


chicken noodle soup (for husband)

My husband is a man of simple tastes…in food that is.  And while he loves all soups I make, he likes “just a clear soup, with some vegetables, and chicken.”

We’ve been dealing with colds of late.  They just seem to keep hanging on.  So husband made yet another request for “just a clear soup, with some vegetables, and chicken.”

Okay.  I can do that.

Ingredients:
1 whole chicken or a whole bone-in breast and two leg/thigh quarters
2 ribs of celery, diced
3 carrots, diced
1 leek, diced (just the white part)
1/8 tsp. granulated roasted garlic (if you don’t have granulated roasted garlic you can drop a clove in the soup and then take it out before serving…husband doesn’t like a heavy garlic presence)
2 tablespoons butter
1/4 cup of dried parsley
salt to taste
8 to 12 cups of water
a cup of dried soup noodles, like alphabets or stars

Directions:
Dice all of the vegetables and drop them into a heated soup pot with 2 tablespoons of butter that has melted.  Saute the vegetables for two to three minutes.
Wrap your chicken or chicken parts in cheesecloth (not necessary for flavor…but totally necessary if you don’t want chicken bones in your soup!)
Put your wrapped chicken in the pot.
Pour the water on top, so all the ingredients are covered.
Bring the soup to a boil and then simmer all day (at least 4 hours)

To serve:
Take the chicken out of the pot.  Let cool slightly and pick the meat off the bones.  Discard the bones.
Bring a pot of water to a boil and boil the noodles.
Drain the noodles.
Combine noodles with some of the soup broth and then add to the pot with the rest of the broth and vegetables.
Chop up the cleaned chicken meat and drop into the soup.

There will be a lot of breast meat available for chicken or chicken salad (another husband favorite) or just dump all the chicken into the soup.

img_4685

Great for a cold day.  Great when you have a cold and don’t feel quite yourself.

soup for a snowy day

Everyone was wondering about a White Christmas.  I am over six decades old and I can remember only handful of Christmases here in New Jersey when there was snow.  Ah.  But January and February and even March.  Snow.  And lots of it.  Yesterday (two weeks after Christmas) was our first snow event.  Just a little.  But enough to crave a pot of soup!

This soup is easy and filling.  So easy you can put it in the crockpot in the morning and go out and play in the snow with your kids, do some craft projects, and watch a movie…and then have a bowl of delicious chill chasing soup to end your day.

This soup is one of my daughter’s recipes that I tweaked just a very little so that husband would like it.  And he did!

Ingredients:
2 (15 ounce) cans of small white beans, rinsed and drained
4 cups of thinly sliced green cabbage (if cabbage is hard to find, or if you don’t like slicing cabbage try using one or two bags of cole slaw from the bagged lettuce area…just the cabbage and carrots…no dressing)
2 large carrots, diced or thinly sliced
2 stalks of celery, diced or thinly sliced
1 clove of garlic (drop in for flavor and then take out before serving)
32 ounces (4 cups) of your favorite chicken or vegetable broth
1 can of stewed tomatoes, mashed and undrained
salt & pepper to taste.

Directions:
You can puree one can of beans and the can of stewed tomatoes in your blender, food processor, or with an immersion blender…if you would like to…not necessary.  Combine all ingredients in a 4 to 5 quart slow cooker and cook 4 to 6 hours on high or 6 to 8 hours on low.  I chose to make my soup on top of the stove.  Works out just as well.

img_4676

We served this with open faced cheese toasties….

Ingredients.
four to eight slices of bread (depends on the size of your crowd and the size of their appetites)
4 to 8 ounces grated cheddar cheese (grate on the small holes)
enough mayonnaise to make a paste
bread cut into 1 inch squares
(you can add chopped ham or bacon to the cheese mixture)

Directions:
Spread a generous amount of the cheese spread on each bread square and put on a baking tray  Put the tray in a preheated 350 degree (F) oven until cheese melts and is slightly bubbly.

Easy, warm, delicious.  Perfect for a snowy day.

Good-For-What-Ails-You Soup

This is an adaptation of the chicken soup my mother and my grandmother made.  The only thing done differently is I do NOT add egg noodles.  But feel free to do so.  My mother  used alphabet noodles or long thin noodles or tiny circles or whatever she had on hand.

Putting the soup together is quick and easy.  Finishing the soup to serve is a little more time consuming and labor intensive.  But one bowl of this soup on a cold windy day or when you are fighting a cold will convince you to make the effort.  And you will get lots of soup that you can eat for days or freeze for later (I use wide mouth Ball jars  but plastic containers work too).

Ingredients:
1 whole chicken (or parts to equal), wrapped in cheesecloth
1 beef shin bone
1/2 head cabbage
1/8 cup dried parsley
1 clove of garlic, pressed
2 ribs of celery
3 carrots
2 leeks or 1 medium onion
1 large or 2 small parsnips
salt to taste

(When growing up we always put 1/2 teaspoon or less of yellow mustard in the soup bowl….it replaces the flavor of salt…very tasty too).

Directions:
*The chicken should be wrapped in cheesecloth.  The procedure is simple.  It doesn’t have to be pretty, it just has to hold the bird together in the pot.  Without wrapping it in cheesecloth the chicken will fall apart in the soup.  No one wants a bone in their soup.  Cheesecloth is inexpensive and can be found in a grocery store.  You will also need cotton string.  Also found in a grocery store.

img_4556

1. Put everything in a large stock pot.

img_4557
2.Bring a tea kettle full of water to the boil and pour over the chicken.  Then add enough water to cover the ingredients by a 1/2 inch or an inch.  Put a lid on the pot.  Simmer for 4 or 5 hours.  If you have to leave the house, leave the lid on and turn the heat off under the pot.  Turn it back on when you get home.  Don’t leave the soup for more than a hour without heat under the pot if you can help it.
3.  When the soup is done (4 to 6 hours), take the chicken out.  There will be lots of very hot broth in the chicken and in the pot.  Be careful! Put the chicken in a bowl to drain.  Pour the broth from the chicken back into the pot.


4.  While the chicken cools enough to pick the meat off, take the vegetables out of the pot.  Slice up the vegetables to bite sized pieces.  Put half of the vegetables back into the pot.
5.  Take the beef shin bone out of the broth.  Scoop the marrow out of the bone and put it back into the broth.
6.  With an immersion blender, puree the marrow, and some of the cabbage, leeks, celery, parsnips, and carrots.  When the soup is a thick consistency to your liking, put the remaining vegetables, beef meat, and some of the chicken back into the pot.  Serve.

I like to put the dark meat in the soup and save the white meat for chicken salad.  Delicious and moist.  Husband likes to add big chunks of white meat to his soup bowl too!

img_4573

Thanksgiving stuffing cups.

Some people call it dressing.  Some call it stuffing.  Some people stuff the bird.  Some cook their stuffing in a casserole or loaf pan.  Some people put in exotic ingredients like sausage and chestnuts…and some people don’t.

We are a plain stuffing people. Bread, butter, celery, onions, salt, butter, chicken broth, milk, water, butter.  And butter.  I discovered a super easy way to make stuffing ahead.  Always a good thing.  Stuffing cups.  (These freeze well so you can have stuffing all year long, not just on Thanksgiving!  My mother used to serve pork chops that were baked in the oven with a pile of stuffing on top of each one).

Ingredients:
-4 to 5 loaves worth of stale bread (I use all kinds …but always use a little brioche and a little corn bread) torn into pieces.

-3 to 4 sticks of butter
– 2 stalks of celery, diced
-2 medium onions, diced
– 1 quart chicken or turkey broth
-2 cups milk (no less than 2% fat)
-water needed to moisten (3 to 4 cups)
-salt to taste
-1/4 cup dried parsley

Directions:
1. tear bread into pieces and put into a large bowl (which will be used for mixing) and let get stale (overnight or for just an hour or two)

img_4484
2. Dice onions and celery.


3. Melt butter in a skillet.

img_4482
4. Fry onions and celery until just soft, about 5 minutes.

img_4489
5. Stir in dried parsley and salt.
6.  Allow butter-onion-celery-parsley mixture to cool
7. Pour onto stale bread in the large bowl.

img_4495
8. Pour broth on top
9. Pour milk on top
10.  Pour one cup of water on top and mix with your hands until the mixture is combined and wet.  If the mixture is too dry, add water one cup at a time (mixing in) until the stuffing is completely wet.
11. Preheat oven to 350 degrees Fahrenheit.
12. Butter each muffin cup. Fill each muffin cup with stuffing…by hand. (Muffins will not puff up or rise so pile high).


13.  Bake stuffing muffins for 20 to 30 minutes until the tops are a crispy and browned.
14.  Take muffins out of the oven.  Allow to cool about 5 minutes in the muffin tins and then turn out of the pans onto a cooling rack.  Serve immediately or cool and store in the freezer or refrigerator and reheat to serve.

img_4516

These muffins are delicious and super easy to make, transport,  and serve!


The boss.


c2f6a701fd300dcf130bb58914833d24

This is the easiest and best applesauce you will ever serve your family.

Collect a bowl of apples of mixed variety.

I buy apples from William Schoeber and Sons Inc. (Monroeville NJ) at their huge stand at the Colllingswood Farmers’ Market.  Their apples are varied in size and type and all are delicious.  Each week I buy apples and each week I move the older apples to a special spot in my refrigerator (a bag inside the fruit drawer) and, when I get ten or so, I make applesauce and serve it warm and fresh for dinner.

Ingredients:
at least ten apples (this mix was Red Delicious, Gala, Honeycrisp, Winesap).

img_4421

Directions:
1. Wash and peel apples

img_4420
2. Cut and slice the apples and put in a large sauce pan or pot that has a lid.
3. Add a splash of water to the pot to keep the apples from sticking to the bottom of the pot and to keep them from burning.  You will only need a splash…less than 1/4 of a cup.
4.  Heat the pot to medium.  The apples will melt down and more liquid will be expelled.  The liquid and water will bubble up.  When the liquid bubbles, test the apples for softness. When the apples are completely soft and can be mashed, take them off the heat and let them continue to cook and cool down in the pot with the lid on.  The whole process should take no more than 30 minutes.  If you like chunky applesauce, mash the cooked apples with a potato masher.  If you like smooth applesauce, puree the apples with an immersion blender, a food processor, or a Foley mill.
5.  Done!

There is no added sugar to this applesauce.  The combination of difference types of apples make for a delicious flavor but you can make this sauce with your favorite apple and no other variety.

Refrigerate what is left…if there is any!

Applesauce can also be frozen.  I freeze this applesauce in zippered freezer bags.  Fill them and lay them flat on your freezer shelf.  Thaw and use.  You can thaw a bag of applesauce in a pan of warm water for warm sauce.  Do mark your bags…I once added applesauce to chicken gravy (I had frozen the gravy the same way and was positive I could tell them all apart).   The applesauce made the gravy a little different.  Edible.  Interesting.  But different.

This applesauce is great for babies.  Nothing in it but apples and you can puree it to the preferred texture.